This BLOG is not managed anymore.

3 Things you should Change in Blogger to make your Blog SEO friendly

In this post I am going to discuss three things you should change in your default blogger account to make your blog SEO friendly. we are going to discuss it step by step.

Very first thing I found recently is that Google by default does not index your label page. When you assign label to post and click on label, URL is something like this "...blogspot.com/search/label/...". All this deails are defined in robots.txt file of your blog.

1. Editing Robots.txt to Let Google index your Label pages.

Now default content of robots.txt is:

User-agent: Mediapartners-Google
Disallow:
User-agent: *
Disallow: /search
Allow: /
Sitemap: http://YOURBLOGNAME.blogspot.com/feeds/posts/default?orderby=UPDATED

This line Disallow: /search stops Google indexing all your label pages.

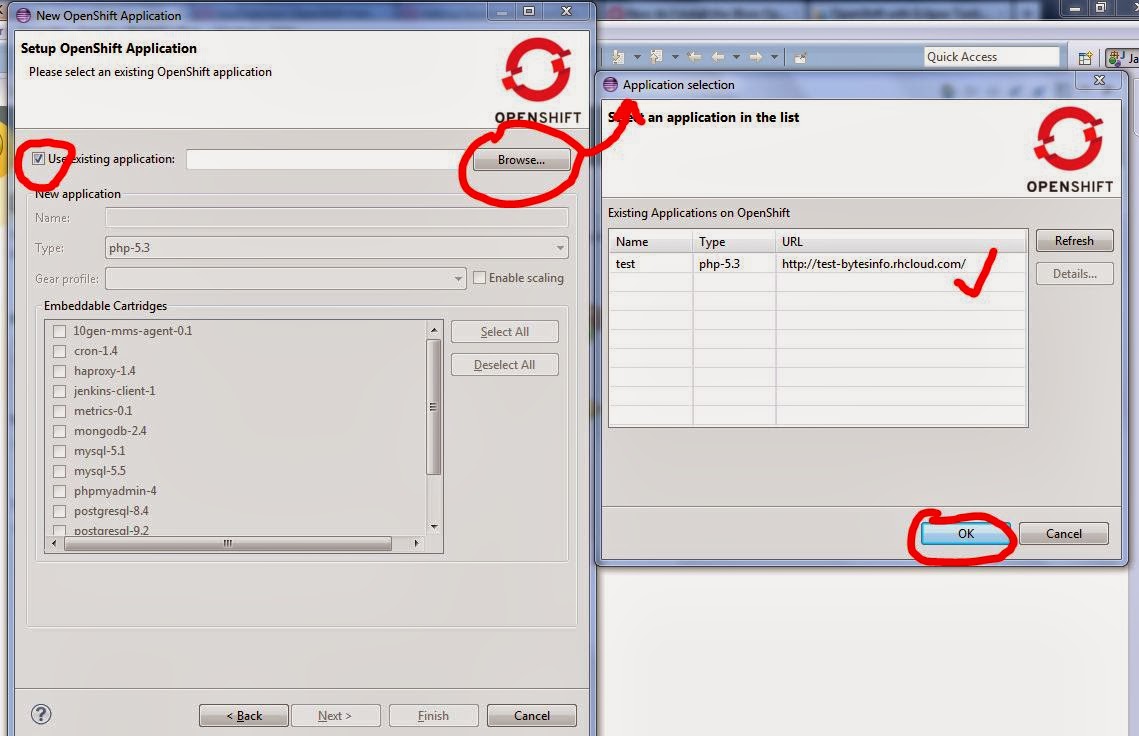
To set custom robots.txt Goto your blogger account > Settings > Search Preferences. Click on "edit" As shown in image.

Paste the following content in it and save changes.

User-agent: Mediapartners-Google
Disallow:

User-agent: *
Disallow: /search?updated-min=
Disallow: /search?updated-max=
Disallow: /*archive.html
Allow: /

Sitemap: http://YOURBLOGNAME.blogspot.com/feeds/posts/default?orderby=UPDATED

Content of this file is understandable. It will not allow your archive pages to be indexed and will allow your label pages to be indexed.

If you want your archive pages to be indexed remove "Disallow: /*archive.html" line.

2. Editing title of posts to make it more SEO friendly.

If you have noticed that by default title of your page is like "YourBlogName : PostTitle". Key to your successful SEO is title of your post. Google always looks for short and meaningful title.

To customize title according to your blog pages follow these steps:

Now Goto your blogger Dashboard > Template. Click "Edit HTML". Look for line

"<title><data:blog.pageName /></title>"

and replace it with following code:

<!-- Checking whether the page is Main/Index page-->
<b:if cond='data:blog.pageType == &quot;index&quot;'>
  <!-- Checking whether the page is Label page -->
  <b:if cond='data:blog.searchLabel'>
    <title>
      Search results for &quot;<data:blog.searchLabel/>&quot;
    </title>
  </b:if>
  <title><data:blog.title /></title>
<b:else/>
  <title><data:blog.pageName /> | <data:blog.title /></title>
</b:if>

If you look at the code abstractly you should get the idea what it is doing. You can also replace string "Search results for" with suitable string.

3. Editing Label and Archive pages to Display titles of posts only instead Full posts.

If you click on label by default it will show every post fully having that label. When user click on Label default view is not user friendly. To change that again Goto your blogger Dashboard > Template. Click "Edit HTML". look for line

"<b:include data='post' name='post'/>"

and replace it with following code:

<b:if cond='data:blog.searchLabel'>
  <h3 class='title-only'>
    <a expr:href='data:post.url'><data:post.title/></a>
  </h3>
<b:else/>
  <b:if cond='data:blog.pageType == &quot;archive&quot;'>
    <h3 class='title-only'>
    <a expr:href='data:post.url'><data:post.title/></a>
    </h3>
  <b:else/>
    <b:include data='post' name='post'/>
  </b:if>
</b:if>

Now click on any label on your blog and your should see That only titles of labeled posts apprear as list on your label pages, as shown in image below(Output for "SEO" Label for my blog).

Doing these changes will surely optimize your blog for SEO. If you are more interested in SEO have a look at this post How to Use Webmaster Tool to increase website's Page rank

Liked What You Read? Take a Next Step. Share It (Click Below) !! Let Others Know.


Using Templates in Django | Python in Web development - Part 3

In previous part of this tutorial series, we show how you can create simple web application using Django. how to develop basic and very first Website using Django.

In this post we are going to see ho we can use Templates in Django to render HTML code on Web page. Initially we hard coded the HTML part in views (views.py)

Let's start with very basic idea about how template works. Goto the directory you created in previous part(or any other Django project) and run python manage.py shell (It is necessary that you open terminal using this command)

Run the following commands,

What we have done is,
  1. Imported template module.
  2. Created template using Template() method. Everything inside the '{{}}' are variables. In our example we have two variables name and age.
  3. To assign value to this variable, we used Context() method, which takes python dictionary as argument.
  4. Now we render the template using render() method. It takes template.Context as argument and return Unicode String. You can render Template with various Context.

Now to use this in Project. you can write following code in your views.py.

views.py
from django.http import HttpResponse
from django.template import Template, Context

def first_project(request):
    return HttpResponse("<h3>Welcome to my First Project</h3>")

def hello(request):
    list_books = ['one','two','three']
    html = """
 <html>
 <head><title>Homepage | Ronak khunt</title></head>
 <body>
  <h1>Welcome {{ uname }}</h1>
  <ol>
  {% for book in list_books %}
   <li>{{book}} ell</li>
  {% endfor %}
  </ol>
 </body></html> 
 """
    t = Template(html)
    c = Context({"uname":'Ronak','list_books':list_books})
    return HttpResponse(t.render(c))

Open your urls.py and set URL for this(hello()) method/View. Also note the use of for loop. Using template does not solve the problem of hard coded HTML.

To solve this problem Django provides get_template() method. Before using this method you have set TEMPLATE_DIRS in your settings.py. Open settings.py and add path to directory in which you want to store your HTML files.

settings.py
......
......
#Don't forget trailing comma at the end.

TEMPLATE_DIRS = (
    '/home/user/django/first_project/templates',
)
......
......

Now create hello.html file in template directory(you have to create this Dir.) and write any code in it. In our case we will write following code.

hello.html
<html>
 <head><title>Homepage | Ronak khunt</title></head>
 <body>
  <h1>Welcome {{ uname }}</h1>
  <ol>
  {% for book in list_books %}
   <li>{{book}} ell</li>
  {% endfor %}
  </ol>
 </body>
</html>

Now open views.py file of your project and add following method.

views.py
#import get_template
from template.loader import get_template
#other import statement
...

def first_project(request):
    ...
def hello(request):
    ...

def hello2(request):
    t = get_template('hello.html')
    c = Context({"uname":'Ronak','list_books':list_books})
    html = t.render(c)
    return HttpResponse(html)

Open your urls.py and set URL for this(hello2()) method/View.

Django also provides shortcut for this. You can use following method as shortcut.

views.py
#import render()
from django.shortcuts import render
#other import statement
...

def first_project(request):
    ...
def hello(request):
    ...
def hello2(request):
    ...

def hello3(request):
    return render(request, 'hello.html', 
                  {"uname":'Ronak','list_books':list_books})

We will also set URL for this(hello3()) View. at the your urls.py will look someting like this.

urls.py
from django.conf.urls.defaults import patterns, include, url
from firstproject.views import first_project, hello, hello2, hello3

urlpatterns = patterns('',

    url(r'^first_project/$',first_project),
    url(r'^hello/$',hello),
    url(r'^hello2/$',hello2),
    url(r'^hello3/$',hello3),

)

That is all about using template in Django.

Was this Information helpful?

Yes No


Using HTML5 Web Worker: Introducing Multithreading in JavaScript

Problem with JavaScript is that it is single thread environment. Every thing we do in JavaScript is managed and calculated by single thread.

Sometimes it happen that you have some more computation intensive task and your webpage performance may degrade(e.g. UI animation or transition performance). In this case, To achieve Parallelism, you can use Worker interface to spawn a new thread in background to do complicated calculation.

Worker thread can not directly communicate with Main thread, that means you can not directly change the content of any element in webpage(i.e. Inside Worker thread you can not run document.getElementById("demo").innerHTML = "demo";. You can not even alert from worker).

When to use Web Worker?

In case if your webpage have some code that is always running in the background like sorting algorithms, finding new position for animation, sine-cosine calculation etc.

Creating new Web Worker

You can create a new Web Worker using Worker() Constructor with Script location as argument.

var worker = new Worker("test_worker.js");

Setting Listener on Worker Thread

You can set Listener on Worker to receive message from Worker thread as following:

worker.addEventListener('message', function(e) { //Your action code goes here //received dataa will be in e.data alert(e.data); }, false);

Third argument here is useCapture. You can Google it for more help. You can also set Listener as following:

worker.onmessage = function (e) { //Your action code goes here alert(e.data); }

You can use either of this way to set Listener on Worker

In "test_worker.js", you can set Listener to receiver message from Main Thread as following:

self.addEventListener('message', function(e) { //Your action code goes here i = i + 1; self.postMessage(i); }, false);

Same way you can also use following method:

var i = 0; self.onmessage = function (e) { //Your action code goes here i = i + 1; self.postMessage(i); }

Here, postMessage() method is used to send message from Worker thread to Main thread and vice versa.

You can terminate Worker Thread using terminate() method:

worker.terminate();

Combining all this together, you can write your Multithreaded code for your highly computation intensive task, Which in turn will improve performance of web application.

Liked What You Read? Take a Next Step. Share It (Click Below) !! Let Others Know.


How to Create Web application with OpenShift using Eclipse ?

Developing and Hosting Web application with OpenShift online - Cloud service from redhat is very easy. In this post I am going to demonstrate how to setup/configure eclipse IDE to Develop and Host Web application with OpenShift.

We are going to do this in 4 parts(Click on the Images below to view it)

Sign up and Creating first Web application in OpenShift

  • Goto https://www.openshift.com/ and Sign up for an account.
  • Click on "MY APPS" and Login into your account or Click Here to Login.
  • You will see page like this:
    Click on "Create your first application now".
  • In next page you will see list of various application with which you can develop your application.
  • Click on the icon highlighted below to add it into your cart(Cart should contain the platform that you are goint to need in your Web application).
  • Next it will ask for public URL using which user can access your Website/WebApplication. then click on "Create application".
  • Click on "Not now, continue". Now you can add more Platform to application as shown below in image. you can also delete this application.

Mean while you can Click on "Appliation" tab above to see the list of your all application.

Setting up OR Configuring Eclipse IDE with OpenShift

Eclipse is an open source IDE(Integrated Development Environment). You can download it here:https://www.eclipse.org/downloads/

  • Now open Eclipse IDE and click Help > Install New Software..
  • Paste the following URL and Click Add.
    • http://download.jboss.org/jbosstools/updates/development/indigo/( for eclipse indigo version)
    • http://download.jboss.org/jbosstools/updates/development/juno/( for eclipse juno version)

    This URL may change acording to your eclipse IDE version.

  • Select Checkbox of "JBoss cloud development tools" and click next. Accept the terms and conditions and Click finish.

After installing plug -in it will restart your IDE.

Downloading/Pulling OpenShift web application into eclipse IDE

  • Now Click New > Other > OpenShift > Openshift appplication.
  • It will ask for your username and password. enter your OpenShift account credential and Click Next.
  • Now you can Create a new Application here or you can Pull/Download your already created Application into Eclipse IDE.
  • Check "use exixting application" Checkbox and Click Browse button.
  • It will display list of all your Web application currently in your OpenShift account. Select any One and click Ok.
  • Click Next. Here you can create new project or use existing project. Again Click Next.
  • If this is first time, It might show that "C:\users\EXAMPLE\git does not exist". Create git directory at given location(then click Back and then click Next again).
  • It might show that "No public key found in your account......" to solve this click "SSH Key wizard".

Configuring SSH key for OpenShift in Eclipse

Now open comand prompt on your machine and enter "mkdir .ssh" command(just to create directory named ".ssh")

  • Click New. Then enter File the name for your key and click Ok. It will add SSH key to your application.
  • Click Finish.

Now you will see you project in eclipse project explorer.After you change code, you have to commit and push it back to cloud.

Pusing/Uploading OpenShift Web application into cloud with Eclipse IDE.

  • Right click on your project > team > commit.
  • Add commit message and click "commit and push".

Now web application has been uploaded to cloud and you can see the changes you have done.

Was this Information helpful?

Yes No


How to Fix/Solve the Website Screen Resolution Problem ?

For long times I have been looking for solution to fix my

Website Resolution problem

. Initially I tried all the responsive design and all that, But nothing works. Then a thought pop up in my Mind about

adjusting website resolution

as per Screen Size of any resolution.

Solution is even more easier than it look.

CSS Provides property named scale which can scale the size(width x height) of any element in the document.

For example, <div id ="t_div"></div>
Now we can scale the size of the division as follow:


#t_div
{
-moz-transform:scale(1.5,1.5); //for Firefox
}

Above code will increase the size of division by x1.5 .

First of all suppose that you have your Website designed for fix size say, WIDTH x HEIGHT(e.g. 1280 x 768, 1366 x 768 etc.).

Now we will use this property of CSS to scale our website's main Tag(<html>) to adjust size according to screen size.

But we have to scale <html> tag dynamically according to screen size. For this we will use jQuery-a javascript library, to

apply CSS Property dynamically

.

Step - 1:

Apply the following CSS to your index page.


html{
 position:absolute;
 margin:0px;
 padding:0px;
}
body{
   position:absolute;
   padding:0px;
   margin:0px; 
   top:0px;
   left:0px;
//set height and width property at its maximum size in 'px' value.
}
step - 2:

Link the jQuery to your link page.you can download the local copy of jQuery OR link the online jQuery by using following tag.

<script src="http://ajax.googleapis.com/ajax/libs/jquery/1.10.2/jquery.min.js"></script>

step - 3:

Now copy the following code to in your javascript.


$(document).ready(function() {

//Other code ...

/*HEIGHT and WIDTH below is your screen size not the your browser's
inner Size. AND if your width is 1280px then replace WIDTH by 1280.0 
(Note 0 after point)in the code below and same for HEIGHT.*/

factor_x = ($(window).width()) / WIDTH;
factor_y = ($(window).height( ))/HEIGHT;

$('html').css("transform","scale("+factor_x+","+factor_y+")");  
//For Firefox
$('html').css("-moz-transform","scale("+factor_x+","+factor_y+")"); 
      
//For Google Chrome
$('html').css("-webkit-transform","scale("+factor_x+","+factor_y+")");

//For Opera
$('html').css("-o-transform","scale("+factor_x+","+factor_y+")");

});

After doing this thing properly, Check your Website for various resolution. It should work.

What we are doing is scaling the <html> tag Up or Down, keeping aspect ratio of screen constant.

In case of any difficulty please comment below.

Was this Information helpful?

Yes No


How to Install MongoDB (NoSQL database) on Windows 7?

In this post i am gonna show you how to install MongoDB, a NoSQL Database, on Windows.

First of all download Related version of MongoDB from http://www.mongodb.org/downloads.There are three types of build is available for windows.

  • 64-bit 2008R2+, Use this build if you are running with 64-bit Windows Server 2008 R2, Windows 7, or greater.
  • 64-bit, Use this, If you are using 64-bit version of windows.
  • 32-bit, Use this, If you are using 32-bit version of windows.

You can check your operating system architecture by - 1) Right click on "My Computer" > Property OR 2) Running wmic os get osarchitecture command in command prompt

After downloading ZIP file, Unzip it. Run this command "move C:\mongodb-win32-* C:\mongodb" ,just to change complex name of folder to "mongodb".

MongoDB requires data folder to store its data. MongoDb stores data in db folder created inside the data folder. This folder will not be created automatically, you have to create it manually.

Now default path for this data directory should be C:\data\db but you can Specify alternate path using following command C:\mongodb\bin\mongod.exe --dbpath "d:\test\data"

Starting MongoDB server from command prompt

To Start MongoDB server from command prompt run C:\mongodb\bin\mongod.exe command. This will start MongoDB server. Prompt will show waiting status. By default server will run on localhost port no 27017. You can change port by starting server using C:\mongodb\bin\mongod.exe --port PORTNO command.

To connect with server we will use mongo.exe shell. Run C:\mongodb\bin\mongo.exe command.

Thats All !!. Now Every time you want to use MongoDB, you have to start server and then run mongo.exe shell. To avoid doing this, you can run MongoDB service , which will start every time windows boot.

Running MongoDB server as a windows service:

To install service run following command, mongod --bind_ip IPADDR --logpath "d:\test\log\mongodb.log" --logappend --dbpath "d:\test\data\db" --port PORTNO --serviceName NAMEofSERVICE --serviceDisplayName "SERVICEDISPLAYNAME" --install. Every attribute in this command is easily understood.

To start service you can use net start NAMEofSERVICE command. And to stop service you can use net stop NAMEofSERVICE command.

If every thing goes well, you have successfullly installed MongoDB on your windows Machine.

Was this Information helpful?

Yes No


Django: How to use Python in Web Application Development- Part 2

In this post I am going to demonstrate how to develop basic and very first website using Django - A Python Web Framework. First of all, You need to have Python and Django installed on your machine. In my previous post I have already explained how to install Django on both Linux and Windows. After installation is completed, you can start your first project.

For better understanding create new directory for Django(just for convenience). To start project run django-admin.py startproject firstproject command in your working directory. ("firstproject" is just a name of Project, you can replace it with any name).

It will create project directory named firstproject. There will be two directory, Outer firstproject and Inner firstproject. If you are using Linux you have to change permission of every single file and directory. To do this, Goto firstproject directory and run chmod 777 * command.Again goto inner firstproject directory and run the same command.

Outer firstproject directory contains manage.py and inner firstproject directory.

  • manage.py is a command line utility. you can run python manage.py help commnad for help.

  • Inner firstproject directory contains another four files.

Now we will create our first module. Create file named views.py in the Inner firstproject diretory. You can give any name to this file but, it is good convention to call it views.py.

Write the following code in this file.(line starting with '#' is comment line)

views.py #bellow statement will import HttpResponse class from
#django.http module

from django.http import HttpResponse

#Following lines of code define function named "first_project".
#function accepts one argument request. And return HttpResponse
# object which contains string.

def first_project(request):
    return HttpResponse("<h3>Welcome to my First Project</h3>")

Now we have written simple module, But our Django project do not about module we've just created. To explicitly join this module with our project we have to assign particular URL to this module.

To configure URL open urls.py file, which resides in inner firstproject directory.

If we remove comments line it only contains following:

urls.py #Line below import patterns, url and include function from
#django.conf.urls.defaults module

from django.conf.urls.defaults import patterns, include, url

#line written below will import function first_project from
#module views, which we just created above.

from firstproject.views import first_project
urlpatterns = patterns('',
)

Now to configure our module, we will add url(r'^first_project$',first_project) line as argument to patterns function. Code will look something like this.

urls.py from django.conf.urls.defaults import patterns, include, url
from firstproject.views import first_project
urlpatterns = patterns('',
    url(r'^first_project/$',first_project),
)

First argument to URL is Regular Expression and Second argument is name of function we want to call when URL is opened.

For basic understanding of Regular Expression,

  • '^' sign will match staring with first_project/(e.g. first_project/first, first_project/help etc.)
  • '$' sign will match ending with first_project/(e.g. .../first/first_project/, .../help/first_project/ etc.)
In our case it will match string "first_project".

After this our basic project is done. To run it, we have to start Django server.

  • Change to outer firstproject directory
  • run python manage.py runserver command. By default it runs our server on 8000 port.
  • Now open Web Browser and type 127.0.0.1:8000 in addressbar.

If every thing works fine, You should see output "Welcome to my First Project". That's it !! this is your first Web application/Web Site using Django Framework.

Here we have simply returned plain text as response. But for real web site you have HTML code to be rendered on your page.

In the Next part of this tutorial we are going to discuss how you can use template to display/render HTML code on your website. Visit next part at: Using Templates in Django | Python in Web development - Part 3

Was this Information helpful?

Yes No


How to install Python on Windows 7?

If you have Linux installed on your machine, python is already installed on your machine. To install Python on Windows Platform follow the steps given below:

How to install python on Windows?

  • step-1: Download python for windows from http://www.python.org/download/releases/2.7.3/(Download MSI installer).
  • step-2: Run installer and it will install python into c:\python27(number 27 may vary according to version installed).
  • step-3: Now we have to add environment variable for python. For this Goto: Control Panel > User Accounts > Change my environment variable( you can also Goto: Computer > System Property > Advance system setting > environment variables).
  • step-4: Then create New(or edit existing) variable named "path" and give value c:\python27. You also need to add C:\python27\Scripts to your path value (you can provide more than one value separated by semi-colon ).
  • step-5: Now type python in command line window and you will go into python prompt(it will be like ">>>").

If you do all the step correctly then python is installed successfully on your Computer.

See how to create twitter bot using Python at:The Python Tutorial for Twitter Bots

Was this Information helpful?

Yes No


Django: How to use Python in Web Application Development

Since last few weeks I have been Searching about How to develop Web Application using Python ?. Then I found solution to this question.

To use Python in Web Application or Web Development, you have to use Python Framework like Django, Pylons, web2py etc.

One of very Famous Framework is Django which is updated regularly. It is open source project. Web Application is very easy to develop with Django. Since Django is Python Framework, you have to have Python installed on your machine to run Django.

Python is directly available on Linux. To install python on Windows visit How to install Python on Windows platform (If you are using windows, I insist to have look at this post and check for necessary environment variables). Now i Suppose you have python installed on your Machine.

There are two version of Django available to you.

  1. The latest official release and
  2. the development version.

Note: Official release is tested and stable version, while Development version contains latest features of Django.

Now download any version from https://www.djangoproject.com/download/.

How to Install Django on Windows and Linux?

Now for Linux run following Command to Install Django:

  • tar xzvf Django-1.5.1.tar.gz(Unzip the compressed file).
  • cd Django-1.5.1(Directory name may vary as per versino.)
  • sudo python setup.py install(terminal will ask for root password).

And For Windows

  • Unzip the tar file using 7-zip or other software.
  • Goto to directory that contains setup.py file.
  • Run python setup.py install command.

Now Django is installed on your Machine.To check installation Go to your Python interpreter then:

  • run import django command.
  • then run django.VERSION command.
  • You should see output: (1, 5, 1, 'final', 0) (Which shows version of Django on your Machine).

To Develop Website using Django you should have basic knowledge of Python.

In Second part, I have described, In Detail, How to Create very Basic and First Web Application using Django Web Framework

Django is very famous for its documentation, So you can Start developing Website using this Framework. Documentation is available at https://docs.djangoproject.com/. Another Useful link is https://www.djangobook.com/


Was this Information helpful?

Yes No


How to use rst2pdf tool on Windows and Linux

In this post I am gonna write basic tutorial on how create PDF using Rst2pdf tool on windows or linux. Rst2pdf can generate very rich quality PDFs from lightly marked up text files(.rst).

It can be installed easily.On Ubuntu linux you can install it using "Ubuntu software centre". To see how to install rst2pdf on windows visit my previous post How to install rst2pdf on Windows platform . Now I Suppose you have rst2pdf installed on your Computer.

I have explained the code in Following code itself. Browse through the code and read carefully. You might also like to see output PDF file simultaneously(link:how to use rst2pdf - example file).

Note: Space and NewLine is most important in this language.

Input:
Example File
============
.. contents::

.. section-numbering::

.. footer::

 Page: ###Page###/###Total###, Example file.

Section/Header 1
----------------

Texts underlined with '=' will be main header and 
Texts underlined with '-' are Sub-section.

Sub-section
~~~~~~~~~~~

Texts underlined with '~' will be Sub-sub-section

Text format
------------

Texts enclosed within **bold** will be Bold.
And those enclosed within *italic* will be Italicized

* ``Texts in double block-quote`` will lok different.

Auto numbering
~~~~~~~~~~~~~~
#. '#' will number the line automaticaly
#. this will be line number 2. 

Images
~~~~~~

.. image:: logo.png

you can specify attribute of image also

.. image:: logo.png
   :height: 140px
   :width: 250px
   :scale: 100
   :alt: alternate text

you can put inline images also:

Assuming |logo.png| is already there on your machine.

.. |logo.png| image:: logo.png
   :height: 10px
   :width: 10px

Block
~~~~~

* you can put any text like command in box using '::'. 
For example, to convert .rst to PDF enter following command ::

 rst2pdf myFile.rst

* you can number the line as follow:

.. code-block:: c
 :linenos:

 #include 
 int main() {
 printf("Hello World\n");
 return 0;
 }

Links
~~~~~

**Links** can be put in following manner

My Blog ``_

you can put **reference link** like this way.
For example, you can visit my blog  [#]_

.. [#] `<http://khuntronak.blogspot.com/>`_

Lists
~~~~~

* a bullet point using "*"

  - a sub-list using "-"

    + yet another sub-list

  - another item

Copy this code into file myFile.rst and Execute rst2pdf myFile.rst and it will generate myFile.pdf.

You can also run rst2pdf myFile.rst -o outputFileName.pdf .
You can see the output PDF file how to use rst2pdf - example file here.

There are many other things you can do with this markup language/


How to install rst2pdf tool on Windows 7?

rst2pdf is a tool for transforming reStructuredText to PDF using ReportLab. To install rst2pdf on windows you also need python because rst2pdf is coded in python.

If you are working on Linux, Python is already installed on your machine. To know how to install python on windows visit my post on How to install python on windows?

How to install rst2pdf on Windows?

Now download rst2pdf source from https://code.google.com/p/rst2pdf/downloads/list.

  • step-1:Unzip the source and copy this folder into C:\ location.
  • step-2:Goto rst2pdf source directory which contains setup.py file.
  • step-3:Run python setup.py install command and it will be installed.

To convert any .rst file to PDF file Run rst2pdf myfile.rst command and you are done.

To learn how to write reStructuredText (.rst) file visit my post How to use rst2pdf tool to Create PDf file on windows or Linux.

Was this Information helpful?

Yes No


How to Use Webmaster Tool to increase website's Pagerank

In my last post, I have already discussed How to Include Your Website in Google Search Result Using Webmaster Tool.

Now to Increase your Website rank in Google search there are many option available in Google webmaster Tool.We will continue from the last post. Go to your Webmaster Dashboard.

  • Click on "Health" option on left panel of the window.
    • Click on "Fetch As Google" .
    • Then enter URL of the Specific page.
    • You can select from Four option available. Then Click on fetch.
    • In the list Below Click on "Submit to index".
    By doing this Google will fetch your page as Google bot and will index your page.
  • Next, Click on "Index Status".
    • This will show you total Index Page of your site. By clicking on Advanced Tab you can see detailed Graph of your indexed page

  • Click on "Traffic" option. Here you will see three option.
    • "Search Queries" option will show keyword that Indexed your Website OR page on Google Search Result.
    • "Links to Your Site" option will show you Backlinks to your site.
    • "Internal links" will show you Link to your site from(various pages of)your site.
  • Next,Click on Optimization > Sitemaps.
    • Enter URL os Sitemap and Click on "ADD/TEST SITEMAP".
    • If your website is Blog on Blogspot.com Then Default sitemap is:/rss.xml(YourBlogName.bogspot.com/rss.xml) OR /atom.xml(YourBlogName.bogspot.com/Atom.xml).

    • Otherwise you can Generate Sitemap for your Website. It is very easy to Generate Sitemap. There are many other websites available which will Generate Sitemap for you. The One I Used is www.xml-sitemaps.com

    • After Generating Sitemap Upload it to The Directory in which your Index file is. And provide the URL.
    • Then refresh the page. You will see Number of Pages Index from your site.
There are many other option available Which you can explore by your self.

How to Include Your Website in Google Search Result ?

It happens that when you create a new Website It will not appear on the Google even if you write complete URL of your Website.In this post I'm gonna show you how to bring your Website on Google search result using Google Webmaster Tool.And This is the step towards SEO(Search Engine Optimization) of your Website.

How to Use Google Webmaster Tool ?

Step-1:

Goto: www.google.com/webmasters and Sign Up for Google Webmaster tool. Then login into Webmaster Tool.

Step-2:

Click on "ADD A SITE" , and Enter URL of your Website. And Click on "Continue".

Step-3:

Now you have to verify ownership of your Website.

  • If you have hosted your web site on Webspace, Then

    1. Download given HTML file.
    2. And upload it to directory in which the index.html file is.

    3. Click on "VERIFY". And it will be verified.

  • Now if your Website is Blog on the Blogspot or WordPress, Then

    1. Click on "Alternate Methods" tab. There will be three option available.
    2. Select HTML tag and copy the give HTML Code (META tag).
    3. Goto your blogger account > templets > Edit HTML.
    4. Paste the code into HEAD tag.
    5. Click on "VERIFY". And it will be verified.

By Clicking on "VERIFY" you will be redirected to dashboard of your site which will show detailed information about your site. It will look something like this:(Click on Image to see it.)

NOTE: You can add more than one Website to Webmaster Tool.

Your site will be on Google page in one days.You can check this by searching with related term of your site. Obviously it will not be on the first page of Google (it might be, if it has unique and quality content).

You can do more rather than just adding Website to Webmaster Tools.For detailed use of webmaster tools visit next part of this post here: How to increase Your Site Rank in Google Using Webmaster Tool


Was this Information helpful?

Yes No


WebM :An open media file format designed for the web

Ads: eBay - one of the UK's largest shopping destinations: ebay Cell Phone, Accessories | eBay

WebM is a Free, Evolving, Open video Format for use with HTML5 video, compressed with VP8 video codec and Vorbis audio codec.The WebM file structure is based on the Matroska media container.Matroska is usually found as .MKV files (matroska video), .MKA files (matroska audio) and .MKS files (subtitles).

VP8:

VP8 is an open video compression format created by On2 Technologies,on September 13,2008. See more

Vorbis audio codec:

it is a free open source project done by the Xiph.Org Foundation. See more

New in WebM:

  • High quality(HQ)video
  • Amazing video playback performance(on slower computers also)
  • 100% free and open to everyone

From last two or three days YouTube has started providing their file in WebM format as a part of HTML5.
  1. To play WebM file on YouTube Goto:www.youtube.com/html5 and click on "Join the HTML5 trial"

  2. Enter "&webm=1" at the end of URL.

  3. Download WebM supported browser on your computer.WebM supported bowsers are:


  • Mozilla Firefox 4.x and above
  • IE9 and above
  • Google chrome 6 and above
  • Opera 10.6x and above

To play WebM file you only need WebM, supported browser or media player.

VLC,Winamp AND Windows media player 12 are supported media player for WebM.

TO convert any video into WebM format download WebM tools from here


WebM is an open source project.you can develope your own code and publish it.You can also participate in this projrct at: Developer

See Also:

How to Create Free Webpage Hit Counter using Javascript?

In this post I am gonna show you how to create your own free Webpage hit counter for your website. Many of newbies or website developer use hit counter available on internet provided by some website,But It slows down your page loading. Hit counter created using "localStorage" in javascript is far better than cookies or any ready made counter. Count will increase even if you close browser window and next time you refresh page

Copy the code given below into script tag and refresh the page to count:


if (localStorage.pagecount)
 {
 localStorage.pagecount=Number(localStorage.pagecount) +1;
 }
else
 {
 localStorage.pagecount=1;
 }
document.write("Visits: " + localStorage.pagecount + " time(s).");

If you want to count page view for session of your browsing you can use "sessionStorage". It will increase count until you close your browser.


Copy the code given below into script tag and refresh the page to count:

if (sessionStorage.clickcount)
  {
  sessionStorage.clickcount=Number(sessionStorage.clickcount)+1;
  }
else
  {
  sessionStorage.clickcount=1;
  }
document.write("You have clicked the button " + 
        sessionStorage.clickcount + " time(s) in this session."); 

Was this Information helpful?

Yes No


How to get free CU.CC Domain URL for 2 years.

You might be tired of your free hosting Domain URL.In this post I am gonna show you how to get free cu.cc (E.g. xxxxx.cu.cc)domain for your site.Yester day i came across the site which provide free domain name(s) for 2 years for free.So I tried to register my blog there and it's very easy.Here is the step to get free domain name

Step-1:

First of all check availability of Domain Name(Enter name of domain in text box below):


OR

Click here to Check for availability.

Step-2:

If you find it available, Select "register 1 year "or "register 2 year" and Click on "Ckeckout".See Below:

Step-3:

Sign up for new account.And then Sign in to your account.Now you have to redirect this URL to your free hosting site URL(E.g. xxxxx.yyyyy.com).For this Click on "My Domains".You will see your domain URL there(E.g. xxxxx.cu.cc).

Step-4:

Click on Pencil tools immeadiately after URL.

Step-5:

Click on "URL Forwarding".Now fill details.Then Click on "Setup URL forwarding".

Step-6:

Now you just type your new URL into Address Bar of your browser. You will see your website there. That's it!

You can see this blog at:

Bytesinfo.cu.cc


Was this Information helpful?

Yes No

See Also:


Easy way to earn money online with advertisements

Ads:

Best selling and shopping at: ebay


Hello there,

In this post i'm gonna giving you information about site which gives you ads to display on your site if you are continuously disapproved by Google Adsense.

I apply many time for Google AdSense but disapproved every time.Suddenly i come come across some site which are alternatives to Google AdSense.

The first one is VigLink. This site provide you in text link for your contents.it will detect some specific product name and will put link to that site.when user click on that link your link count will increase. Click here to register with VigLink

The second is clicksor .This site provides text link with graphic link also. it will also show pop-up on your site and you will get money for every click and referral.Payment will be done using paypal or check. Click Here to register with clicksor

The next is CBPROADS it will provide you a direct link of ads with various types of ads(e.g ontextual ads,widget ads for mobile ,block image ads etc.).Click here to register with CBPROADS

The next is adpruddence it will provide you a direct CODE of ads with various types and size of ad blocks.Click here to register with adprudence

The next is infolinks.This site is good if your site have enough textual content on it.it will provide in text link for your page.

The next is eDomz.you just need to register your site here.they will verify your site and reply you.need minimum 25$ to withdraw money.Click Here to register for eDomz

Some more are also avalable:

www.affinity.com/
www.infolinks.com/join-us
www.luminate.com/
www.hubpages.com/
www.tagvillage.com
www.breezeads.com/
Protected by Copyscape DMCA Copyright Detector

See Also:


Example of polymorphism in java with abstract class

Ads:

Best selling and shopping at: ebay

free Download unlimited wallpaper at: Photoshare.byethost3.com


Program definition:

Write a program to create abstract class shape having instance variables dim1(dimension) in double and color and two member methods: 1.void display():displays the color of the specific shape. 2.abstract void area(): gives the area for given shape.

Note:

A method for which you want to ensure that it must be overridden(In following example area()),you can define such method as abstract methodand class that contains one or more abstract method must be abstract class.Just put keyword abstract to define it as abstract class

abstract class shape
{
 private double dim1;
 String color;
 shape(double d1,String c)
 {
  dim1=d1;color=c;
 }
 void display()
 {
  System.out.println("Color :"+color);
 }
 abstract void area();
 public double getdim1(){return(dim1);}
}
class triangle extends shape
{
 private double dim2;//dim1=base,dim2-altitude
 triangle(double d1,double d2,String c)
 {
  super(d1,c);
  dim2=d2;
 }
 void area()
 {
  double d1=getdim1();
  double a;
  a =d1*dim2/2;
  System.out.println("Area :"+a);
 }
}
class square extends shape
{
 
 square(double d1,String c)
 {
  super(d1,c);
 }
 void area()
 {
  double d1=getdim1();
  double a=d1*d1;
  System.out.println("Area :"+a);
 }
}
class rectangle extends shape
{
 private double dim2;//dim1=width,dim2=breath
 rectangle(double d1,double d2,String c)
 {
  super(d1,c);
  dim2=d2;
 }
 void area()
 {
  double d1=getdim1();
  double a= d1*dim2;
  System.out.println("Area :"+a);
 }
}
class circle extends shape
{
 
 circle(double d1,String c)
 {
  super(d1,c);
 }
 void area()
 {
  double d1=getdim1();
  double pi=3.1416;
  double a= 2*pi*d1;
  System.out.println("Area :"+a);

 }
}
class a9
{
 public static void main(String args[])
 {
  triangle t = new triangle(2,4,"red");
  t.display();
  t.area();
  square s = new square(4,"green");
  s.display();
  s.area();
  rectangle r = new rectangle(4,8,"yellow");
  r.display();
  r.area();
  circle c = new circle(6,"orange");
  c.display();
  c.area();
 }
}

For more Assignment problems Click Here


See Also: